Showing posts with label Maintenance. Show all posts

Wednesday, January 21, 2009

Spare Parts 2 (Engine) - Nabira 1.8

Alternator Belt Tensioner.
GM Part No: 90571758


Spark Plug- Double Head
GM Part No: 9195109
The factory fitted spark plug uses single head electrode.

Timing Belt.
GM Part No: 24451895

Roller Follower (Small)
GM Part No: 55352713


Roller Follower (Big)
GM Part No: 55350580

Roller Tensioner
GM Part No: 24426500

Sunday, January 18, 2009

Spare Parts (Air Condition) - Nabira 1.8

Cabin Filter ( Pollen Filter)
GM Part no: 93182436
Replacement is adviseable for every 30k interval.
OEM Cabin Filter from Bosch which is common for Astra/Zafira/Nabira
Bosch Part No: A 603

Spare Parts (Suspension) - Nabira 1.8

Stabilizer Link (Pendulum)
GM part no: 90498745
My Nabira factory fitted stabilizer link was replaced after 60k.

Spare Parts (Engine) - Nabira 1.8

GM Alternator Belt - Replace the factory fitted belt on my Nabira at 60,+++ km.

GM Part No: 9192588

Spare Parts (Engine) - Nabira 1.8

Water Pump- recommended to be replaced at every 60k km, however, mine still running good at 100k..will be replaced during next major service at 110k km.

GM Part No: 90543935

Water Pump - KWP (OEM)
Part No: 10727

See the different between GM & KWP Water Pump. GM original water pump on the left.

Oil Filter
GM Part No: 93156300

Wednesday, November 26, 2008

Replacement Wiper

The factory fitted wiper uses SWF wiper, which considerably work ok.


Then, replaced it with AC Delco Beam Wiper Blade, which curved onto the windscreen. The pair bought from Lotte Mart, Seoul Station.

Now, using GM OEM wiper bought from Hatyai SC.

D.I.Y - Gear Shift Loose

This is considered a common problem for Nabira/Zafira , when suddenly you feel a sense of loose when shifting gear. Later, the problem exergerated to a level where engaging gear is no more posibble.
If this happen, you can still rectify the problem temporarily until proper repair been done to the gear cable. There are options for this, you can opt for a cheaper solution or hopelessly ask mechanics to fix it, which a much more expensive.
It happens to me already, and fortunately I get a cheaper option. Instead of changing the defective gear cable with a new unit, I replaced only the plastic bush with a teflon bush.
1. After removing the battery unit and battery tray, you can see the gear shift lever attached with gear cable socket.
In this condition, the black plastic bush has already gone.


2. The gear cable socket detached from gear lever knob, which makes shifting gear is not possible.

3. Close look of gear cable socket without the black plastic bush.


4. Instead of replacing the whole gear cable with a new unit, you can just replace the bush with a teflon bush which is much more durable to excessive heat of Malaysian weather.


5. Just fix the bush back onto the gear lever knob and then re-installed the gear cable socket onto the teflon bush. With this option, you can saved a considerable amount of money as compared to replacing with a new unit of gear cable.


6. This is the gear bush drawing prepared after reverse engineering process...(the drawing is not from GM, instead this is owned prepared, will not be responsibled if there is a tolerancing issue which might cause a miss fit after machining).

Saturday, November 8, 2008

DIN 72 MF AC Delco Battery & Voltage Display

My forth battery replacement in 4 years span. Opted for DIN72 instead of normal DIN66 battery. The 1st battery lasted for 2yrs with good record and then replaced it with GP Atlas MF battery. However, the 2nd battery dies after 8 months without prior warning. Fortunately, I managed to get a warranty claim and used the same type of GP Atlas for another 11 months before decided to switch to AC Delco DIN 72.

Installed a voltage meter display unit as an extra precaution.

Friday, February 8, 2008

Pollen Filter - Replacement

D.I.Y- after 23,000km, since i've 4 days leave and got nothing to do, now is the good time for changing the pollen filter.
Bought this original GM Pollen Filter from GM, Hatyai SC.


Replacement step:
1. Remove the lower trip cover for aircond duct underneath the front passenger dashboard. Here you need to unfastened 2 unit clips and unscrew 2 unit fasteners using T20 torx screw driver.


the clips


2. Then, you need to remove the glovebox. Unscrew 3 units fasteners using T20 torx screw driver located on top and at side of the glove box.


3. There are another 2 fasteners located at the bottom of glovebox that you need to unscrew.


4. After dismantle the glovebox, it will look like this..you can see the pollen filter housing, but you need to dismantle the lower metal support to get access to open the pollen filter door housing.


Don't forget, before taking out the glovebox- detact the glovebox light receptacle.


5. Dismantle 4 fasteners using size 10mm socket and unclip the trim clip.


my advise, the unfastened the 2 left side fastener..it's better to removed the lower trim cover of side sill as this will provide space for socket.


6. Disconnect the air cond duct for foot. Then, you can see the pollen filter housing.


7. Pollen filter housing. Unclip 5 clip pin to open the housing door and you can see the filter inside


8. See the different...after 23,000km running
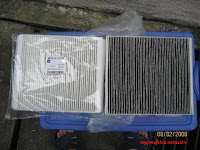


9. Make sure you install new pollen filter in the correct direction


10. Reinstall in reverse direction then..